Most plant personnel have been confronted with leaking flange connections in their piping systems. These leaks are most often the result of mechanical problems, for example, too much or insufficient gasket compression. Sometimes, however, the wrong gasket has been used for a particular service, and this needs to be determined at the outset of an investigation into the root cause(s) of a leak. The first step in troubleshooting leaks is to address the same factors that govern gasket selection in the first place: temperature, media, pressure and application.
Begin by comparing system operating temperatures to gasket ratings. It is preferable that the gasket be rated well above expected operating maximums. Cycling temperatures are harder on bolted joints than steady states, so note which is the case in the situation under investigation.
In addition, the gasket must be compatible with the media in the system, including the presence of any cleanouts or additives to the primary fluid. Caustic cleanouts, for example, will attack most fiber-based gaskets.
As with temperature, the pressure rating of the gasket should exceed the system’s operating pressure. Note any periodic surges, spikes or hammering, and whether the service includes some form of heat tracing, which is commonly used on pipelines transporting products that solidify at ambient temperatures. This can create huge increases in pressure, which typically occur on startup when the heat trace begins to liquefy the process fluid, creating trapped pockets, or if the line is left completely full of a liquid and a section of pipe or vessel is closed at both ends.
The application can be regarded as the mechanical details of the joint, the primary consideration of which is the available compressive load on the gasket. This load determines if the gasket is appropriate for the assembly. Dividing the available compressive load generated by the fasteners in the flange assembly by the surface contact area of the gasket yields the expected compressive stress on the gasket. In addition to available load, note whether the flanges are raised- or flat-face. Observe surface finish and other mechanical factors, such as the depth of a recess when installing a gasket in a "groove-to-flat" arrangement.
Compressive load
Since gasket selection must be based on service conditions and the types of flanges used, these factors must be considered when troubleshooting a leak.
Available compressive load in a bolted joint largely determines whether a rubber-bound fiber sheet, polytetrafluoroethylene (PTFE) or metal gasket should be used.
If available stress is between 600 and 1,200 psi, a rubber gasket will work. At stresses below 600 psi, special gaskets might be required for a consistently tight seal.
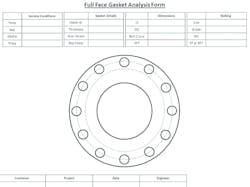
Figure 2. Sample worksheet for recording notes and thickness measurements
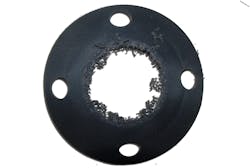
In contrast, stresses above 1,200 psi can crush or split a rubber gasket, but still may be too low to form an effective seal with harder materials such as standard PTFE or rubber-bound fiber sheet gaskets (See Figure 1). These materials work best at stresses of 3,000 psi or more.
The available compressive load is also subject to the type of flange used. A forged steel flange can accommodate greater stresses than fiber reinforced plastic (FRP), plastic (PVC, CPVC, etc.) and cast iron flanges. Elastomer gaskets have the lowest load requirements and metal gaskets the highest, with greater crush resistance and internal pressure capability.
Leaks in flanged joints often result from the mechanics of the application, resulting in either too much or too little compressive load. This may be because incorrect or uneven loads are applied to the bolts, or because achieving the proper load given the flange design and available bolting is impossible. Under the same bolting, a flat-face flange with a full-face gasket will not apply the same compressive force as a raised-face flange with its smaller compressed area.
Among the types of flanges that typically produce low compressive gasket loads and attendant problems are the previously mentioned flat cast iron flanges commonly found in valves and pumps; glass-lined equipment; non-metallic flanges such as FRP, PVC, CPVC and HDPE; and rolled angle iron flanges for ductwork, vessels and vacuum service tanks.
Troubleshooting gaskets
Having addressed these considerations, the process of actually troubleshooting a leaking gasket begins with shutting down the system; draining off the pressure; emptying the fluid; and removing all nuts, bolts and washers. Then carefully remove the gasket from the flange, trying to keep it intact. Note, however, that even a partial gasket can be useful if its compressed thickness can be measured (See Figure 2).
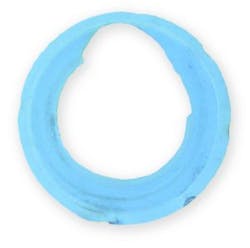
First examine the gasket to determine if it was damaged during installation. Look for rollover at the edge onto the seating surface, or an impression from the flanges showing it was not centered properly. Also look for any visual clues or physical damage, such as a faint imprint indicating undercompression, heavy compression and splitting from overcompression and possible erosion. Caused by abrasive media, erosion is typically seen as a curved area that has been removed or has worn away at the gasket’s inner diameter (I.D.). Unlike chemical attack, it is usually limited to one area with smooth edges (See Figure 3).
Figure 3. Effects of erosion on a PTFE gasket
Check for the use of an anti-stick agent, anti-seize compound or silicone on the seating surfaces of the gasket and flanges. These can impair sealing performance by reducing the friction between the gasket and flanges, allowing the gasket to extrude, blow out or crush. Then inspect the seating surfaces of the gasket, looking for irregular impressions that might have been created by flange imperfections or old gasketing that was not completely removed before the new gasket was installed.
Finally, measure the thickness of the gasket all around the seating area using a micrometer with a flat measuring face. Sharp-pointed micrometers can dig into soft gaskets, yielding inaccurate measurements. Calipers are not usually helpful since the gasket may have uncompressed areas at the I.D. and outer diameter (O.D.), preventing them from measuring the true thickness in the compressed area.
These thickness measurements indicate whether a gasket was compressed adequately and evenly. If compression was greater toward the O.D. than the I.D. of the seating area, flange rotation or bending has occurred. Measuring the uncompressed thickness in two or three places is important for calculating compression as a percentage. Note that the original thickness of the gasket typically varies slightly from the nominal thickness, so it is important to know the actual uncompressed thickness.
Calculating compression
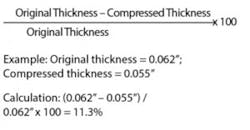
Once the thickness has been measured all the way around the gasket, calculate the compression as a percentage of the original thickness as follows:
Compare this percentage to the expected compression, noting that available stress on the gasket is calculated using gasket surface area and available bolt load at reasonable bolt stress. In making this comparison, use the manufacturer’s published compressibility values (based on ASTM F36 method), which are typically tested at 5,000 psi compressive stress for fiber and PTFE gaskets. Compression versus load curves also can be used. Compression on the used gasket that was well above or below the expected compression may indicate the cause of the leak.
Compression can often vary significantly from one section of a gasket to another, indicating misaligned flanges, improperly supported pipes or uneven loading of the bolts. Overcompression can crush or cause splitting in some gaskets, which can be mistaken for chemical attack in rubber gaskets that have been installed in
raised-face flanges.
In some cases, manufacturers may be able to provide photographs showing the effects of crushing, chemical attack, erosion, "popcorning" from monomer polymerization and other common issues.
Effectively troubleshooting gasket leaks logically begins with determining if the proper gasket was selected for the given service conditions. This can accelerate the process by identifying issues that can subsequently be confirmed by examination of the failed gasket. The process can be further facilitated by submitting a sample of the used gasket to the manufacturer for analysis.
Dave Burgess and Matt Tones are senior application engineers with Garlock Sealing Technologies, based in Palmyra, New York.


