7 Best Practices for Bearing Inspection to Optimize Performance
The following blog post is excerpted from the "AEGIS Bearing Protection Handbook" by Electro Static Technology.
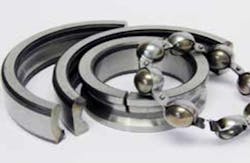
ANSI/EASA Standard AR100-2010, Section 2, Mechanical Repair: 2.2 Bearings:
“Bearings should be inspected for fretting, fluting, frosting, scoring or other damage.”
Cutting and inspecting every bearing in motors that come in for repair, especially motors operated on variable frequency drives, will often provide vital information to make the best repair recommendation and improve performance. Following the seven best practices noted here will help end-users effectively diagnose bearing problems going forward.
1. Inspect the bearing and bearing cavity, and retain a sample of the lubricant if further analysis is warranted. Look for:
- Contamination
- Signs of excessive heat
- Hardening of grease
- Abnormal coloration (blackened grease)
- Excess grease escaping the bearing
READ ALSO: Sustainability Matters—Shaft Grounding Proves Essential for Bearing Protection
2. Cut the outer race into halves. Follow established safety precautions and use personal protective equipment, including eye protection, hearing protection, face shield, gloves, and protective clothing.
3. Inspect the grease and contamination in the bearing.
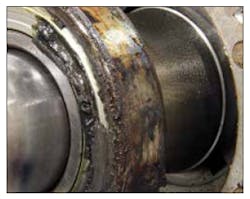
- Burnt Grease: Continuous electrical arcing in the motor bearings will often rapidly deteriorate the lubricating capability of the grease and cause bearing race damage. When an arc occurs, the oil component of the grease is heated beyond its temperature capacity.
- Contamination: In addition to the burnt grease, the arcing causes small metal particles to loosen from the bearing races/balls, which are distributed in the grease. These particles are abrasive and intensify the bearing wear.
4. Clean the bearing’s components using a degreaser or solvent. Follow all safety precautions.
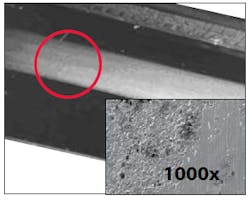
5. Inspect for evidence of Electrical Discharge Machining (EDM): EDM are millions of microscopic electrical pits created when current discharges through the motor’s bearings. The electrical voltage overcomes the dielectric of the bearing lubrication and instantaneously arcs through the inner race, through the ball, and to the outer race. The individual pit is usually between 5 and 10 micron diameter.
6. Frosting: This will appear to be a grey discolored line around all or part of the bearing race and may be evident in the inner and outer race (see photo to right). The discoloration may be caused by wear or by electrical EDM. Examination under a microscope may be required to determine if the line is EDM or not. If the motor was operated on a VFD with no bearing protection there is a high likelihood that the frosting is from EDM.
7. Fluting Damage: Identified by a distinctive washboard pattern. Fluting can be identified with the naked eye or with 10x magnification. Fluting is sometimes confused with mechanical bearing damage so care should be taken to correctly assign electrical fluting damage to the pattern observed.
In addition to using this manual, please refer to other bearing failure analysis experts in order to determine the root cause of failure. To download a report template to assist in your bearing analysis, visit www.est-aegis.com/bearing. To request the full version of Electro Static Technology's "AGEIS Bearing Protection Handbook," visit www.est-aegis.com/bearing/index2.htm.


