A major part of keeping equipment running smoothly involves regular maintenance and upkeep and ensuring that the machinery is kept lubricated and properly aligned.
When shafts or belts on rotating equipment are misaligned, the risk of costly, unplanned machine downtime rises dramatically. Misalignment also damages seals and couplings. Lubrication problems often can be traced to seals that have been compromised by shaft or belt misalignment. Simply replacing a seal will not stop future seal failure and associated loss of lubricant — only correcting the misalignment will solve the problem.
Failure to align the shafts or belts properly will increase the amount of stress on the units, resulting in a range of potential problems that ultimately can seriously impact a company’s bottom line:
- Increased friction, resulting in excessive wear, excessive energy consumption, and the possibility of premature breakdown of equipment
- Excessive wear on bearings and seals, leading to premature failure
- Premature shaft and coupling failure
- Excessive seal lubricant leakage
- Failure of coupling and foundation bolts
- Increased vibration and noise
Shaft Misalignment
Shaft misalignment is responsible for as much as 50 percent of all costs related to rotating machinery breakdowns. Accurately aligning shafts can prevent a large number of machinery breakdowns and reduce much of the unplanned downtime that results in a loss of production. In today’s challenging environment of reducing costs and optimizing assets, the necessity of accurate shaft alignment has never been greater.
Correct Alignment
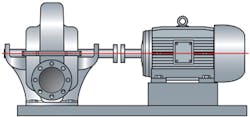
Machines need to be aligned in both the horizontal and vertical planes. Misalignment can be due to parallel or angular misalignment, or a combination of both.
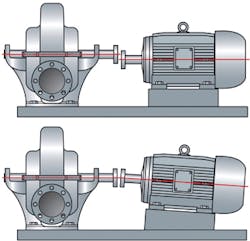
Basically, there are two types of misalignment: parallel (or offset) misalignment and angular misalignment. With parallel misalignment, the center lines of both shafts run parallel to one another, but they are offset. With angular misalignment, the shafts run at an angle to one other.
Types of Shaft Misalignment
Parallel misalignment can be further subcategorized as either horizontal or vertical misalignment. Horizontal misalignment refers to misalignment of the shafts in the horizontal plane, while vertical misalignment refers to misalignment of the shafts in the vertical plane. Parallel horizontal misalignment results when the motor shaft is moved horizontally away from the pump shaft, but both shafts still operate in the same horizontal plane and parallel. Parallel vertical misalignment occurs when the motor shaft is moved vertically away from the pump shaft, but both shafts still operate in the same vertical plane and parallel.
Similarly, angular misalignment can be further subcategorized as either horizontal or vertical misalignment. Angular horizontal misalignment occurs when the motor shaft is at an angle with the pump shaft, but both shafts still operate in the same horizontal plane. Angular vertical misalignment occurs when the motor shaft is at an angle with the pump shaft, but both shafts still operate in the same vertical plane. Serious instances of misalignment can occur as a result of parallel misalignment, angular misalignment, or a combination of the two.
Correcting Shaft Alignment
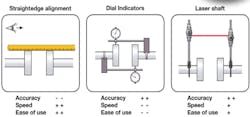
Traditional alignment methods still in common use today include visual inspection combined with a straightedge or ruler. The straightedge is positioned on two bearings supporting one or more shafts, while the maintenance inspector visually assesses whether or not the components are properly aligned. While such rough alignment methods have the advantage of being quick and relatively easy, they are also highly inaccurate and do not produce the exacting degree of accuracy required by today”s precision machinery.
Dial indicators represent another traditional method of measuring misalignment. But while dial indicators do offer a higher degree of accuracy, they also present certain problems. Not only do they require a high level of technical skill to be used properly, but the effort is also generally quite time-consuming.
Furthermore, dial indicators do not provide real-time values that enable technicians to simultaneously measure and attain correct alignment. Instead, the dial indicators must be removed and then reinstalled after each alignment adjustment is completed. As a result, the process for obtaining critical measurements, such as feet values and coupling values, can be lengthy. Feet values indicate whether the pedestal or footing on which the machine rests is loose or compromised in some other way. Coupling values attest to the integrity of a coupling connecting two shafts.
Laser-guided tools, generally speaking, are quick, accurate, easy-to-use, and require only a single installation. In addition, they deliver consistently better accuracy than dial indicators and they do not require special skills to obtain accurate results virtually every time. Shaft alignment laser-guided tools typically consist of two units, each capable of emitting a precise laser beam and detecting a laser beam from its mate, plus a handheld control device.
The units securely mount to shafts via magnetic brackets and/or a magnetic chain. To run them, the operator activates the instrument via the handheld control device and each unit emits a precise laser line projected onto the other unit’s detector. A display on the handheld device provides real-time coupling and feet values during the alignment process, avoiding the need to remove and reinstall the measuring units after each alignment adjustment. In addition, the laser system tool documents the values, which can be downloaded to a computer and used as a benchmark for future alignment inspections.
More advanced laser-alignment systems come with a built-in step-by-step alignment process, from preparation, inspection and evaluation through correction, reporting and analysis. Some models also offer a unique database to store data regarding visual inspections on oil leakage, oil level, foundation bolt status, and wear indications.
Laser-alignment methods represent a marked improvement over traditional methods. A laser-driven shaft alignment device allows one to adjust alignment with far more speed and accuracy than either the straightedge or dial method. There are many devices available on the market, with different degrees of sophistication and price ranges.
Belt or Pulley Alignment
Belt alignment or pulley alignment is also an important maintenance task and, when carried out correctly, can prevent unplanned shutdowns and achieve considerable cost savings. Because belt alignment depends on the correct alignment of the pulleys on which the belt operates, belt and pulley alignment are generally considered one process. Belt alignment involves aligning the belts in a manner that results in the least wear on the belts and lowest energy loss for the machine or driver unit. In practice this means the grooves of the pulleys are in line with one another.
Consequences of Belt Misalignment
Like shaft misalignment, belt misalignment can result in a wide range of detrimental and sometimes dangerous consequences, including:
- Reduced efficiency of the machine
- Increased wear on pulleys and belts
- Increased friction
- Excessive energy consumption
- Increased noise and vibration and
- Premature bearing and belt failure
Unless the misalignment is corrected, a new replacement belt will likely wear out quickly. Continuous operation in a misaligned state also will increase wear on the pulleys themselves, as well as their axles, shafts and bearings.
Maintaining belts in proper alignment is just as important as aligning shafts. For that reason, laser-guided belt aligning devices are an essential part of an up-to-date maintenance operator’s tool kit.
Belt alignment laser-guided tools consist of two components, a laser emitting unit and a 3-D receiver. The tool uses V-guides along with powerful magnets that quickly attach in the pulley groove to facilitate alignment of pulleys even if they have unequal widths or dissimilar faces.
Nature of Misalignment
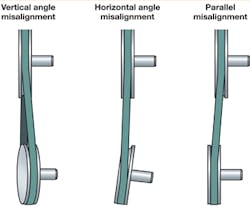
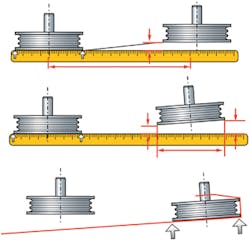
As with shaft misalignment, there are various types of belt misalignment. In practice, a combination of different misalignments is often encountered simultaneously. For this reason, it is important that an alignment instrument both diagnoses and details the nature of the machine”s misalignment. The following illustrations depict the three different types of belt misalignment.
Vertical angle or twisted misalignment occurs when one of the pulleys has an angular error from the vertical angle plane. This is usually caused by incorrect positioning of the machine and can be corrected by lifting either the front or rear feet of the motor to which the pulley is attached, depending on the direction of the vertical angle error. This differs from shaft alignment in that one never moves both feet in a vertical direction to reach the desired result.
Horizontal angle misalignment occurs when the driver and the driven unit are not positioned parallel to each other. Incorrect positioning of applications, such as the motor, typically can cause this type of misalignment. Horizontal angle misalignment generally can be corrected by moving the front or rear feet forward or backward on their guides, depending on the direction of the horizontal angle error, in order to twist the motor around its center.
Parallel misalignment is the least complex form of misalignment. It is often caused by the incorrect positioning of the motor along its shaft axis, positioned either too far forward or backward compared to the other shaft. Or it can be caused by incorrect positioning of the pulleys on their respective shaft, where one of the pulleys needs to be adjusted on the shaft.
Belt Alignment Methods
Belt alignment can be performed by either traditional visual methods or the laser method. Traditional methods usually employ strings and/or straightedges. Laser methods utilize a laser beam, which provides for a much higher degree of accuracy.
The main advantage of these traditional methods is the limited length of time needed for adjustment, although the use of a straightedge takes more time than visual assessment alone. The major disadvantage is the lack of accuracy. For example, some belt manufacturers recommend a maximum misalignment of 0.5 degrees or even 0.25 degrees, which is difficult to accomplish by using visual assessment. These traditional low-tech methods involve a good deal of trial and error, naked eye approximation, and rough estimates. All told, that means a large margin for error, which is unacceptable for precision pulley alignment.
A laser belt alignment system enables one to adjust alignment with far more speed and accuracy than with traditional methods. Systems available on the market can be categorized according to the way the devices are attached to the pulley and the way they align. Generally, there are two groups, one that aligns the face of the pulleys and one that aligns the grooves of the pulleys.
Most products on the market use the face or side of the pulley as a reference for aligning the pulleys and belts. The advantage of this method is that it can be used for belt types other than V-belts, such as timing belts. V-belts, however, comprise the majority of belts found on the market, especially in industrial applications. The main disadvantage is that the face of the pulley is the only reference point. This means that only the faces of the pulleys are aligned with each other. This method results in varying degrees of accuracy when the pulleys are of different thickness, brands or kinds (e.g. one single-belt pulley and one multiple-belt pulley) or when the faces are not well finished.
Products that align using the grooves of the pulleys in which the belt runs tend to provide substantially higher levels of accuracy regardless of the thickness, brand or type of pulleys.
Soft Foot
"Soft foot" is a condition in which one of the feet of a machine does not sit flat on the baseplate. Soft foot is among the most common causes of misalignment. Accordingly, one of the first steps to take in an alignment check is to assess the equipment’s foundation and employ a suitable shaft alignment tool to identify and correct potential soft foot conditions. Some laser-guided alignment tools have a soft foot operation capability that guides the user through corrective procedures. Shim plates generally can be used to bring machines back into both vertical and horizontal alignment.
Bearings out of square with their housings are another common cause of misalignment. Often a condition of wear, the out-of-square bearing and/or its housing will need to be corrected or replaced in order to bring machines back into alignment.
Maintaining Correct Alignment
Once misalignment is detected, analyzed and corrected, an ongoing alignment maintenance program is important to keep operations running smoothly. As part of this maintenance, alignment checks should be performed to document alignment conditions before a machine is removed from service. This gives users the ability to install new or rebuilt machines with the same proper alignment values. In addition, a maintenance program should include periodic checks to verify conditions are still within tolerance.
Taking these simple steps to detect, correct and maintain proper shaft and belt alignment can prevent costly, unplanned downtime. Fortunately, there is a range of modern laser-alignment options available to make this process easier than ever before.
Mark Ely is currently based in Holland as a product marketing manager at SKF Maintenance Products. He is a Marine Engineer graduate and served in cruise ships for a few years, where he quickly learned the real world, hands-on side of engineering. With nearly 25 years of service within SKF, Mr. Ely has extensive experience in maintenance applications and shaft alignment, as well as product development and product marketing. Mr. Ely can be reached at [email protected].
Karl Vietsch has worked for the SKF Condition Monitoring Centre, Livingston, for almost three years. During this time, Mr. Vietsch has served as a Business Engineer (BSc), and provided alignment support service by telephone. In his role as a project manager for gearbox repair, he called SKF to do the alignment job for a gearbox that he and his team had repaired. Karl has significant mechanical hands-on experience and has strived to make the lives of the alignment engineer and management easier. The result of his efforts is the development of the SKF TKSA 60 and TKSA 80 shaft alignment systems. Reach Mr. Vietsch at [email protected].

