Upgrade from mechanical to electronic pressure measurement
Collectors of high-end cameras and wristwatches value those objects for their extraordinary mechanical movements and build quality. Yet, as impressive as those mechanisms are, today’s electronics provide the same functionality — and often more precise and reliable operation — with vastly simpler construction, lower cost and greatly reduced maintenance.
Let’s apply this concept to pressure gauges. While they are not nearly as complex as a Leica camera or a Rolex watch, a high-quality mechanical pressure gauge is a formidable bit of machinery in its own right. Unfortunately, any such mechanism is subject to the need for cleaning and adjusting over time, which is why so many mechanisms are now replaced by electronics, including pressure gauges.
That point suggests the question, why have mechanical pressure gauges at all? There are many electronic options, such as Emerson’s Rosemount Pressure Transmitter family, of which there are millions installed around the world. Every major instrumentation provider has something similar since the range of pressure measuring applications in process plants is enormous. So why gauges?
- Cost — Mechanical gauges can be surprisingly inexpensive, at least their initial purchase price, compared to a transmitter. Of course, the full lifecycle cost can add up to many times the purchase price.
- Handy form factor — Where a measurement does not need to interface with a larger automation system and operator rounds are predictable, gauges are easy to read and well understood by individuals at all skill levels.
- Tradition — In many situations, a pressure gauge is installed because, “that’s the way we’ve always done it.” It’s an easier approach than investigating what might work better in a specific situation.
Construction and accuracy
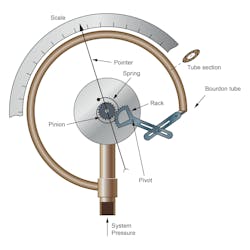
The most common basic mechanical gauge construction depends on a curved bourdon tube mechanism (Figure 1) where pressure causes the tube to straighten in proportion to the pressure level. This movement gets conveyed via a small gear train to make a needle move in response, indicating the value on a scale.
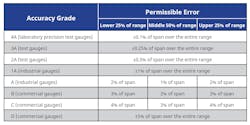
While this design approach is used widely, there is a huge range of price and accuracy options available. Gauges can be purchased at hardware stores for less than $10, whereas an industrial-grade unit can easily be several hundred dollars. ASME B40.1 provides eight grade levels directly related to accuracy for mechanical gauges (Figure 2), ranging from ±0.1%, to ±5% of span over the entire range, with prices rising as grade requirements become more stringent.
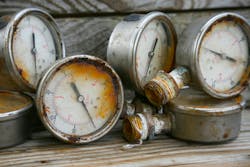
A walk through a sizeable process manufacturing plant will virtually always turn up broken gauges in some minimally monitored section (Figure 3). These may simply be stuck, the indicator needle may have broken off, or, in the worst situations, they may be leaking the fluid they are supposed to be monitoring.
Such damage can result from impacts, inadequate maintenance, overpressure shocks, corrosion, vibration and metal fatigue. One particular problem is that a gauge may appear to be showing a valid reading, while it is actually stuck in that position, misleading any technician recording the value during rounds.
Calibration
In any process manufacturing environment, there are instruments measuring level, temperature, flow and pressure. If the measurement has any meaningful consequence for the process, every instrument must be calibrated to ensure that it is providing a reliable and consistent reading within the tolerance band relevant to the application. Naturally, this includes pressure gauges.
Here is a typical calibration procedure: Say a new 0-500 psi (0-35 bar) gauge is purchased for a process application. It is a 1A gauge, so ±1% of span. When it arrives, it goes immediately to the calibration shop for inspection and checking. The technician puts it on a hydrostatic testing bench (Figure 4) so it can be compared with a 3A (±0.25% of span) test gauge at six to eight points on the scale. (The test gauge must be under a calibration program as well, checked against a traceable standard.) If necessary, the technician will open the case, and then make careful adjustments where necessary, to correct various conditions.
Where required, corrections must be made by trial-and-error adjustment of setscrews, and possibly even by bending links slightly. The procedure, including any adjustments made, must be written down on the gauge’s maintenance and calibration record. At some prescribed time interval, the process must be performed again. If the gauge is well constructed and the technician is experienced, the process works and the unit can be put into its application, but the calibration process is very time consuming.
This entire procedure is built upon two assumptions. First, gauges invariably require calibration and tweaking to ensure best performance, even brand new from the factory. Second, having a technician performing such a procedure and making adjustments improves performance. Both of these assumptions are becoming obsolete as electronic gauges are becoming more common and skilled technicians are becoming scarcer.
Electronic gauges cut calibration time, provide substantial cost savings
The procedure just described is costly because it is time consuming and requires a highly skilled technician, and if the reading of a given gauge is the least bit critical, calibration may be needed several times per year. Eventually, a gauge cannot be brought back into spec and it is scrapped. Now, multiply that by the number of gauges in the facility and the labor-hours add up quickly. It does not take long for the cost of calibrations to surpass the cost of the gauge itself, and to eventually go many times over during its service life. The less desirable alternative happens when too few technicians are available. Calibration intervals get skipped, allowing many units to fall out of compliance.
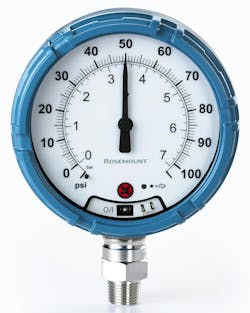
The more practical approach is to replace mechanical gauges with something more durable and accurate: an electronic pressure gauge (Figure 5), which may even include wireless data transfer. Let’s be specific about what this is. We are talking about a pressure gauge that has a needle and scale, so it has the same appearance and behavior as mechanical versions. However, it has no bourdon tube and no finicky internal mechanism. The bourdon tube is replaced with an electronic sensor, more like an electronic pressure transmitter. The needle moves over the scale driven by a tiny stepper motor in response to an internal electronic mechanism sensing pressure changes.
This approach provides a far more durable gauge, but directly comparable to a 2A (±0.5% of span) mechanical version, so it is suitable for most process applications. Electronic pressure gauges are engineered to provide a much higher level of protection against damage from overpressure incidents, and higher burst pressure protection than is possible with bourdon tube designs. There are two levels of process isolation to avoid loss of containment. This sensor design is resistant to drift, so calibration intervals can be far longer than with comparable mechanical units, without risk of accuracy loss.
Comparing the capabilities between electronic and mechanical versions (Figure 6), the electronic approach has many advantages.
Naturally, since it is an electronic gauge, an internal battery is required. Many digital pressure gauges with a numeric display have battery life measured in weeks or even days, but this design, even with wireless communication, can operate for up to 10 years with the original battery. An indicator on the face lights up when the battery should be replaced.
This electronic configuration is available in two versions, with and without WirelessHART communication, designated as the Rosemount Wireless Pressure Gauge (WPG) and Rosemount Smart Pressure Gauge (SPG), respectively.
The right applications
Electronic pressure gauges fit ideally into a middle-grade application range. If a pressure reading is simply for monitoring and not critical to a process, a less-expensive mechanical gauge may be all that is necessary. If the gauge fails, there may be no significant loss, and correcting the situation does not threaten production.
On the other hand, a pressure reading critical to a process probably already has an electronic pressure transmitter, such as Emerson’s Rosemount 3051. In these situations, something more sophisticated and expensive is certainly justified.
The applications where the SPG and WPG excel are those where the reading is moderately important, and the costs of maintaining and calibrating mechanical gauges are too high. Adding WirelessHART capabilities provides a best-of-both-worlds solution since it can connect to a larger process automation system, such as a pressure transmitter, while serving the local display requirement of a pressure gauge. As WirelessHART networks are now deployed in many process manufacturing facilities, this is a very economical option as a new WPG can simply be added to an existing network.
Here are four examples of actual deployments using WPGs that illustrate its key advantages:
Pressure relief valve (PRV) monitoring — PRVs are often coupled with rupture disks to protect the PRV from a hazardous process, but disks often develop pinhole leaks, effectively disabling the system from opening at the original setpoint. Adding a WPG to read pressure in the space between the rupture disk and PRV detects when a leak has developed, and it warns maintenance that a potential safety concern has developed.
Oil and gas wellhead sites — For both on and offshore well monitoring, it is critical to monitor annulus pressure between the delivery pipe and well casing. These readings require monitoring several times each day and can be subject to spikes. An electronic gauge easily withstands such spikes and reports pressure excursions to maintenance and operators.
Pump monitoring — Centrifugal pumps are used in countless process plant applications, but they can become maintenance headaches. Here are two typical scenarios: First, monitoring pump oil pressure is necessary to ensure correct lubrication, but this can be disrupted by leaking and system clogs. Adding a strategic WPG identifies when these problems are developing. Second, if pump inlet pressure is not high enough, cavitation can begin, so using a WPG to monitor pressure at the inlet helps avoid pump damage.
Heat exchanger monitoring — When heat exchangers develop internal fouling, their efficiency drops very quickly. Using electronic gauges to measure the difference between inlet and outlet pressure can indicate when fouling is becoming heavy enough to impede fluid flow and heat transfer. This is a very simple solution, but it helps plant staff avoid energy waste and determine efficient cleaning schedules.
The better choice
Bourdon tube pressure gauges are a good choice in many non-demanding applications, but they may not suffice when installed in tougher process applications and in harsh environments, particularly when the process media is corrosive or at high temperatures. Moreover, when the costs of calibration and maintenance are added, any initial price advantage can disappear quickly.
The versatility and durability of a Rosemount WPG and SPG make these a better choice in many demanding applications. When reliable pressure monitoring is needed in demanding applications, digital pressure gauges are often the wiser choice, and the WPG and SPG provide the required ability to deliver reliable information, with safer operation and the option for communication via WirelessHART.
Connor Oberle is a global pressure product manager with Emerson, where he is responsible for the Rosemount 3051S platform of products, as well as the Rosemount Pressure Gauge offering. In this role he works to implement product solutions that improve plant safety, increase process efficiency, and enhance process insight. Connor holds a B.S. degree in Mechanical Engineering from the University of North Dakota and an MBA from the University of St. Thomas.
Emerson
About the Author
Connor Oberle
Global pressure product manager for Emerson Automation Solutions
Connor Oberle is a global pressure product manager for Emerson’s Automation Solutions business in Shakopee, Minnesota, with responsibility for Rosemount pressure transmitters. He earned a B.S. in mechanical engineering from the University of North Dakota.
