Ultrasonic corrosion gauging with dual element transducers
Just about anything that is made of common structural metals can be subject to corrosion. A particularly important problem that many industries face is the measurement of remaining wall thickness in pipes, tubes or tanks that may be corroded on the inside surface. Such corrosion is often not detectable by visual inspection without cutting or disassembling the pipe or tank. Structural steel beams, particularly bridge supports and steel pilings, are also subject to corrosion that reduces the original thickness of the metal. If undetected over a period of time, corrosion will weaken walls and possibly lead to dangerous structural failures. Both safety and economic considerations require that metal pipes, tanks or structures that are subject to corrosion be inspected on a regular basis. Ultrasonic testing is a widely accepted nondestructive method for performing this inspection, and ultrasonic testing of corroded metal is usually done with dual element transducers (duals).
Theory of operation
The irregular backwall surfaces frequently encountered in corrosion situations give duals an advantage over single element transducers. All ultrasonic gauging involves timing the round trip of a sound pulse in a test material. Because solid metal has an acoustic impedance that differs from that of gases, liquids or corrosion products, such as scale or rust, the sound pulse will reflect from the far surface of the remaining metal. The test instrument is calibrated with the appropriate velocity of sound for that test material and computes the wall thickness from the simple formula:Most gauges designed for corrosion applications measure the round-trip transit time interval to the first backwall echo. Many instruments can also measure the interval between successive multiple echoes, commonly known as echo-to-echo. This technique can be useful in situations involving thick paint or similar coatings; however, echo-to-echo measurements can be less effective at detecting pitting and measuring the true minimum thickness of pitted pipe or tank walls.
Dual element transducers incorporate separate transmitting and receiving elements mounted on delay lines that are usually cut at an angle to the horizontal plane (the roof angle) so that the transmitting and receiving beam paths cross beneath the surface of the test piece. This crossed-beam design of duals provides a pseudo-focusing effect that optimizes measurement of minimum wall thickness in corrosion applications.
Duals will typically be more sensitive than single element transducers to echoes from the base of pits that represent minimum remaining wall thickness. Also, duals may often be used more effectively on rough outside surfaces. Couplant trapped in pockets on rough sound entry surfaces can produce long, ringing interface echoes that interfere with the near-surface resolution of single element transducers. With a dual, the receiver element is unlikely to pick up this false echo. Finally, duals may be designed for high-temperature measurements that would damage single element contact transducers.
Equipment
A number of small, handheld ultrasonic thickness gauges have been specifically designed for corrosion survey applications. Typically, these gauges will be used with a dedicated group of dual element transducers, covering various thickness ranges and temperature conditions. In many applications, and especially ones at elevated temperatures, a user may require an ultrasonic waveform display (A-scan) to help verify that valid echoes are being detected. In corrosion applications, duals can be used effectively with flaw detectors as well. Digital flaw detectors provide a thickness measurement as well as a waveform display.
Procedure
The following general principles apply to all corrosion measurements with dual element transducers, whether used with a portable thickness gauge or with a flaw detector. Keep in mind that in all cases, the instrument must be properly calibrated for sound velocity and zero offset in accordance with the procedure found in the instrument’s operating manual.
Transducer selection
For any ultrasonic measurement system (transducer plus thickness gauge or flaw detector), there will be a minimum material thickness, below which, valid measurements will not be possible. Normally, this minimum range will be specified in the manufacturer’s literature. For thinner applications, a higher frequency transducer would be used, whereas for a thicker application, a lower frequency transducer would be used. In corrosion applications where minimum remaining wall thickness is normally the parameter being measured, it is particularly important to be aware of the specified range of the transducer being used. If a dual is used to measure a test piece that is below its designed minimum range, the gauge may detect invalid echoes and display an incorrectly high thickness reading. The exact measurable minimum in a given application depends on material velocity, surface condition and geometry, and it should be determined experimentally by the user.
Surface condition
Loose or flaking scale, rust, corrosion or dirt on the outside surface of a test piece will interfere with the coupling of sound energy from the transducer into the test material. Thus, any loose debris of this sort should be cleaned from the specimen with a wire brush or file before measurements are attempted. Generally, it is possible to make corrosion measurements through thin layers of rust, as long as the rust is smooth and well bonded to the metal below.
Some very rough cast or corroded surfaces may have to be filed or sanded smooth in order to ensure proper sound coupling. It may also be necessary to remove paint if it has been applied in thick coats or if it is flaking off the metal. While it is often possible to make standard corrosion measurements through thin coats of paint (on the order of a few thousandths of an inch or 0.1 to 0.2 mm), thick paint will attenuate signals or possibly create false echoes and requires special techniques such as an echo-to-echo measurement.
Severe pitting on the outside surface of a pipe or tank can be a problem. On some rough surfaces, the use of a gel or grease rather than a liquid couplant will help transmit sound energy into the test piece. In extreme cases, it will be necessary to file or grind the surface sufficiently flat to permit contact with the face of the transducer. In applications where deep pitting occurs on the outside of a pipe or tank, it is usually necessary to measure remaining metal thickness from the base of the pits to the inside wall.
There are sophisticated ultrasonic techniques using focused immersion transducers that can measure directly from the base of an external pit to the inside wall, but this is generally not practical for field work. The conventional technique is to measure unpitted metal thickness ultrasonically, measure pit depth mechanically, and subtract the pit depth from the measured wall thickness. Alternatively, one can file or grind the surface down to the base of the pits, within limits as defined by a procedure, and measure normally. As with any difficult application, experimentation with actual part samples is the best way to determine the limits of a particular gauge/transducer combination on a given surface.
Transducer positioning and alignment
For proper sound coupling, the transducer must be pressed firmly against the test surface. On small-diameter cylindrical surfaces, such as pipes, hold the transducer so that the sound barrier material visible on the probe face is aligned perpendicular to the center axis of the pipe (see Figure 3).While firm hand pressure on the transducer is necessary for good readings, the probe should not be scraped along or twisted against a rough metal surface. This will scratch the face of the transducer and eventually degrade performance. The safest technique for moving a transducer along a rough surface is to pick it up and reposition it for each measurement — not to slide it along. However, this is not always possible, especially in flaw detection when users are scrubbing for flaws. Remember that an ultrasonic test measures thickness at only one point within the beam of the transducer and that, in corrosion situations, wall thicknesses often vary considerably.
Test procedures usually call for making a number of measurements within a defined area and establishing a minimum and/or average thickness. Ideally, data should be taken at increments no greater than half the diameter of the transducer to help ensure that no pits or other local variations in wall thickness are missed. It is up to the user to define a pattern of data collection appropriate to the needs of a given application. It is possible that on some severely corroded or pitted materials, there will be spots where readings cannot be obtained. This can happen when the inside surface of the material is so irregular that the sound energy is scattered rather than being reflected back to the transducer.
Lack of a reading may also indicate a thickness outside the range of the transducer and instrument being used. Generally, an inability to obtain a valid thickness reading at a particular point on a test specimen could be a sign of a seriously degraded wall, which may warrant investigation by other means.
High-temperature measurements
Corrosion measurements at elevated temperatures require special consideration. Keep in mind the following points:
1. Be sure that the surface temperature of the test piece does not exceed the maximum specified temperature for the transducer and couplant being used. Some duals are designed for room temperature measurements only.
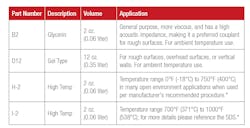
2. Use a couplant rated for the temperature of the application. All high-temperature couplants will boil off at some temperature, leaving a hard residue that is not able to transmit sound energy. Maximum recommended temperatures for Olympus couplants are shown in Table 1.
3. Make measurements quickly and allow the transducer body to cool between readings. High-temperature duals have delay lines made of thermally tolerant material, but with continuous exposure to very high temperatures, the inside of the probe will heat to a point where bonds will fail, destroying the transducer. The instrument’s freeze function is useful for capturing a reading during tests that require brief surface contact.
4. Remember that both material sound velocity and transducer zero offset will change with temperature. For maximum accuracy at high temperatures, velocity calibration should be performed using a section of the test bar of known thickness heated to the temperature where measurements are to be performed. Alternately, advanced gauges provide software that can be programmed to automatically compensate velocity for known temperature variations. Additionally, it is frequently necessary to increase gain when measuring at elevated temperatures.
Gauges and flaw detectors
An ultrasonic corrosion gauge is designed to detect and measure echoes reflected from the inside wall of a test piece. It is possible that material discontinuities such as flaws, cracks, voids or laminations may produce echoes of sufficient amplitude to trigger the gauge, showing up as unusually thin measurements at particular spots on a test piece. However, a corrosion gauge is not designed for flaw or crack detection and cannot be relied upon to detect material discontinuities. A proper evaluation of material discontinuities requires an ultrasonic flaw detector used by a properly trained operator. In general, any unexplained readings by a corrosion gauge merit further examination.
Greg Bauer is a senior product specialist for portable NDT products at Olympus Scientific Solutions in Waltham, Massachusetts. He takes a lead role in new product development, advanced instrument operation and application training, and he is responsible for the development of resource materials for new products including training presentations, instrument web videos, marketing documents and website content. Bauer graduated from the University of Massachusetts Dartmouth in 2011 with a bachelor’s degree in mechanical engineering.


