5 ways to detect and prevent pressure gauge failures before they happen
No matter the industry, internal process pressure is a critical performance indicator for an industrial fluid system. Too low or too high pressures can cause a negative impact on product yield and quality and can potentially create a safety hazard for system operators.
For these reasons, pressure gauges are a critical part of any fluid system, offering an easy visual indicator of whether the system is operating within the desired pressure range, or if a problem is imminent. Given their importance, it is imperative that pressure gauges be in good working condition at all times — for example, a broken gauge that misrepresents process pressures can lead to poor system performance. Beyond indicating inaccurate pressures, broken gauges are potential leak points, releasing harmful system fluid into the environment. In addition, troubleshooting, fixing or replacing malfunctioning pressure gauges can be a drag on overall productivity, requiring system downtime and preventable costs.
A proactive approach to pressure gauge management and maintenance can be an effective solution to these issues. An operator’s ability to recognize inaccurate pressure readings and other indicators of pending gauge failure can help avoid undesirable outcomes, increasing overall plant efficiency and safety.
What to look for? Here are the top five causes of gauge failure, their indicators and some steps plants can take to fix the problem before it causes a bigger operational issue.
1. Overpressure
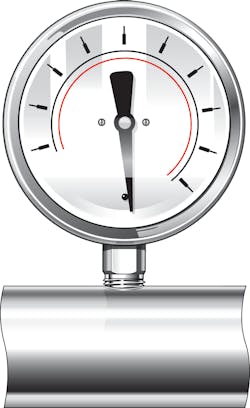
One common issue in industrial systems is the use of a pressure gauge that does not have the proper range for the application and is therefore incapable of reflecting true system pressure.This is often indicated by the gauge’s pointer pegged against the stop pin (shown in Figure 1), a sign that the system flow is operating past the gauge’s maximum rated pressure.
This doesn’t necessarily mean the system is operating at too high a pressure; more often, the wrong gauge has been installed for the application. Not only does this offer a poor view of true operational conditions, but it can cause the gauge’s Bourdon tube to rupture. The Bourdon tube is a curved, hollow tube, most commonly made from metal, that is inside the gauge. The tube reacts to the system pressure and will move the connected pointer to display a pressure reading on the gauge dial. A rupture can cause a potential safety hazard.
An appropriate gauge for an application should ideally have a rated range that is two times the expected system operating pressure, offering a larger window of measurement. Additionally, a relief valve can be installed in the system preceding the gauge to provide overpressure protection. In more extreme system conditions, use a gauge with an orifice restrictor (0.3 mm) to restrict flow, or consider a diaphragm seal option, rather than a Bourdon tube design, for a more robust solution.
2. Pressure spikes
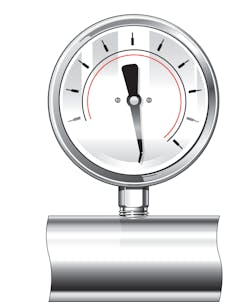
If operators observe a gauge pointer that is broken, bent, nicked or otherwise damaged (see the example in Figure 2), this is typically an indication that the gauge has been subjected to an unexpected spike in system pressure, where the spike has caused the pointer to forcefully hit the stop pin. These spikes are often caused by a pump cycling on or off, or a valve that has been opened or closed upstream from the pressure valve.
This may be another sign that the gauge is not properly rated for its application. However, pressure spikes can be avoided by using sound system design practices that can eliminate unpredictable pressures and the resulting strain on system components. If troubleshooters are unsure of where a design issue may be causing such spikes, consulting a trustworthy vendor for design expertise can be helpful.
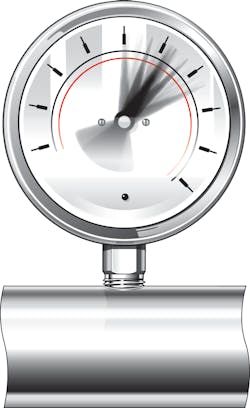
Fast, frequent cycling of system fluid can create unintended wear on gauge movement components, which can negatively impact the ability of the gauge to measure pressure. This issue is commonly indicated by a fluttering pointer (see Figure 3).
This can once again lead to the rupture of the Bourdon tube and total gauge failure, and it is another issue that can be alleviated through reevaluating system design. Repositioning the gauge within the application can reduce the cycling speed seen by the gauge and help maintain the needed measurement integrity. If a system redesign is not feasible, using a gauge with liquid fill, a gauge orifice restrictor or a snubber will help mitigate the negative effects of pulsation.
4. Mechanical vibration
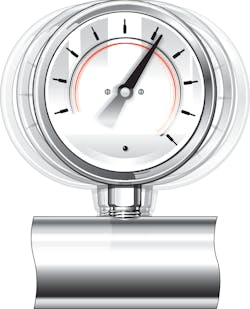
Vibrations resulting from a misaligned pump or reciprocating compressor can result in a missing pointer, window, window ring or back plate. Poor mounting can cause the same issues. Operators may also notice black dust on the gauge dial, or scrapes on the dial from a loose pointer, each indicating that vibration damage is occurring (see Figure 4).
Vibration can break the movement component that connects to the Bourdon tube, rendering the dial unable to reflect real system pressure. Using a liquid case fill will dampen the movement and eliminate or reduce the avoidable vibration in the system. Or, in extreme system conditions, using a snubber or a gauge with a diaphragm seal can help.
5. Overheating
Many industrial process systems operate at high temperatures, which can interfere with a gauge’s ability to operate properly. Elevated temperature stresses the gauge’s pressure system and affects measurement accuracy by causing a strain on the Bourdon tube. A gauge that is mounted too close to excessively hot system liquids or gases may have a discolored dial or liquid case fill due to heat-related breakdown of critical gauge components (see Figure 5).
Selecting a gauge with a higher temperature rating, which can better accommodate actual system temperatures, is a simple fix. In extreme cases dealing with very hot processes, choose a gauge with a diaphragm seal or cooling element.
Achieving optimal gauge performance
Armed with the knowledge of how to identify and detect gauge malfunction, operators can avoid the potential consequences associated with total gauge failure. But making the right choices upfront can more reliably decrease the potential of these issues and can enhance overall system performance.
Investing time to analyze the system’s needs before making a gauge purchase decision can promote a safer, more efficient system overall. Unsure where to begin? Working with a knowledgeable gauge supplier who understands a wide variety of fluid system needs can be a good first step. A supplier who offers training and education for plant teams is even better. Seeking out the right vendor for these needs can bring major benefits for a system, its operating team, and the plant’s bottom line.
Editor’s note: An original version of this article appeared on the Swagelok Reference Point blog here: www.swagelok.com/en/blog/gauge-failure-modes.
Dave Ross is Senior Technical Service Engineer for Swagelok Company.
Dave Ross
Dave Ross is Senior Technical Service Engineer for Swagelok Company.


